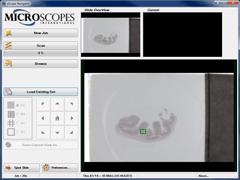
The uScope Navigator Software provides the user interface to the uScopeMXII. The Navigator allows you to locate regions of interest on your standard glass slide.
See Your Slide Immediately
Choose the Area of Interest to Tile
When you insert a slide, the uScope Navigator software immediately displays an overview image where you can select the area of interest from which to collect a set of tiles.
The region of interest can be selected from the available 20mmx34mm visible slide area. Once selected, the uScope Navigator prompts you for the job name and begins tiling.


Tiling an Area of Interest
Let uScopeMX do the Hard Work
While collecting the set of tiles, the uScopeMXII auto-focuses each image in the area of interest and updates the on-screen representation as it writes the in-focus images to disk.
Navigating the Area of Interest
Would You Like to See More?
Once all tiles from an area of interest have been collected, you may click on a tile to zoom in and view that single tile, a 3×3 pattern, or a 5×5 pattern of tiles.


Using the Built-in Measurement Tools
Click & Drag to Measure Organelles
The built-in digital micrometer displays on-screen and allows you to take precise measurements anywhere within the captured image tiles. No additional reticals or optics are required for accurate image size determinations.
User-Defined Image Filter Strategies
Users can combine image enhancement filters to apply to slide images. Image filter strategies may be used to visually improve the displayed image.

Publication-Quality Images
Images are Saved in an Industry-Standard File Format
The uScope Navigator saves image tiles in the high-quality JPEG image file format. Files can be shared with colleagues and clients and are easily included in Word, Powerpoint, and image sharing web sites.


